
ANTI-DRONE JAMMER SYSTEM
The Portable UAV/Drone Signal Jammer SA-U006 Is Latest Product, Against The Widespread Use Of UAVs Nowadays. It Disables The Targeted UAV By Jamming The 300MHz~6GHz Signal, So As To Force The UAV To Fall Or Return. The Jamming Distance Reaches More Than 800 Meters.
Terms and Conditions
30-day money-back guarantee
Shipping: 2-3 Business Days

Display Of Whole
①.Lead Rail:Mounting Position Of Sight
②.Button Of The Equipment Power Switch:Press The Button After 1 Seconds And Press 3 Seconds To Turn On The Power Supply Of The Equipment.
③,④.Hanging Ring Of Braces:Mounting Position Of Gun Braces
⑤.Gun Buckling Machine:Press To Open And Close The Current Frequency Band
⑥.Liquid Crystal Display:This Screen Allows You To Set Parameters
⑦.Charging Socket:Use A Matching Charger To Recharge The Equipment At This Port
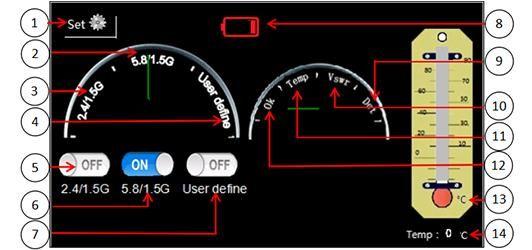
Control Of Equipment
①.Setting Key:After Clicking, You Can Enter The Settings Selection Interface
②.5.8GHz / 1.5GHz Band Mode:Pointer To This Position Indicates Current 5.8 GHz/ 1.5GHz Band Mode
③.2.4GHz / 1.5GHz Band Mode:Pointer To This Position Indicates Current 2.4 GHz/ 1.5GHz Band Mode
④.User-Defined Band Mode:Pointer To This Position Indicates Current User-Defined Band Mode
⑤.Setting Key Of The 5.8GHz / 1.5GHz Band Mode:Click And Then Pull The Gun Trigger To Open The 5.8G And 1.5G Bands
⑥.Setting Key Of The 2.4GHz / 1.5GHz Band Mode:Click And Then Pull The Gun Trigger To Open The 2.4G And 1.5G Bands
⑦.Setting Key Of The User-Defined Band Mode:Click And Then Pull The Gun Trigger To Open The User-Defined Band Mode(Note: Up To 4 Bands Can Be Opened At The Same Time)
⑧.Power Display Icon:Display Of Battery Power
⑨.The Indicating Position Of The Detection Alarm:Pointer To This Position Indicates Current Device Detection Exception
⑩.The Indicating Position Of The Standing Wave Alarm:Pointer To This Position Indicates Current Device Standing Wave Alarm
⑪.The Indicating Position Of The Temperature Alarm:Pointer To This Position Indicates Current Device Temperature Alarm
⑫.The Indicating Position Of The Normal Operation Condition:Pointer To This Position Indicates That It Is Currently In Normal Working State
⑬.Graphical Indication Of Working Temperature:Displays The Temperature Value Of The Device When It Is Currently Working
⑭.Numerical Indication Of Working Temperature:Displays The Temperature Value Of The Device When It Is Currently Working
Setting Interface
Setting Interface
⑮.Setting Key Of The User-Defined Band Mode:After Clicking, Enter The Frequency Band Settings Interface
⑯.Setting Keys For Sound And Vibration:After Clicking, Enter The Sound And Vibration Settings Interface
⑰.Icon Of The Return To The Main Interface Menu:After Clicking, Return To The Main Interface Menu Interface
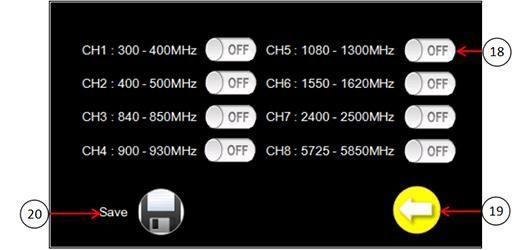
Interface Of The Frequency Band Settings
⑱.Setting Keys For Opening And Closing Frequency Bands: First, When Clicked, The“ ON ”Icon Is Turned On And The“ OFF” Icon Is Turned Off,Then Click To Save, Return To The Main Interface, And Then Press The Button Machine, You Can Open The Current Set Of Frequency Band
⑲.Icon Of The Return To The Main Interface Menu:After Clicking, Return To The Main Interface Menu Interface
⑳.Icon Of The Save Band Settings:After Clicking, Save The Current Set Of Frequency Band
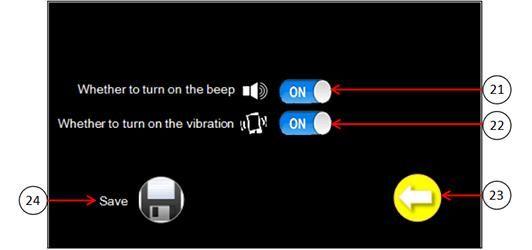
Setting Interface Of The Vibration And Sound
㉑.Sound Setting Button:When Clicked, The ON Icon Is Turned On And The OFF Icon Is Turned Off
㉒.Vibration Setting Button:When Clicked, The ON Icon Is Turned On And The OFF Icon Is Turned Off
㉓.Icon Of The Return To The Main Interface Menu:Same As ⑰
㉔.Save The Current Settings Button:After Clicking, Save The Current Settings For Sound And Vibration
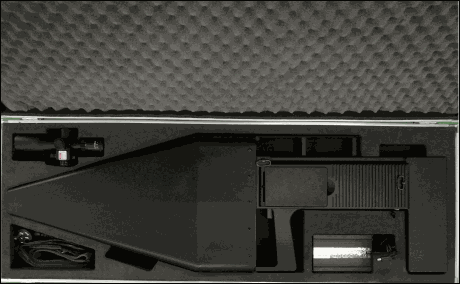
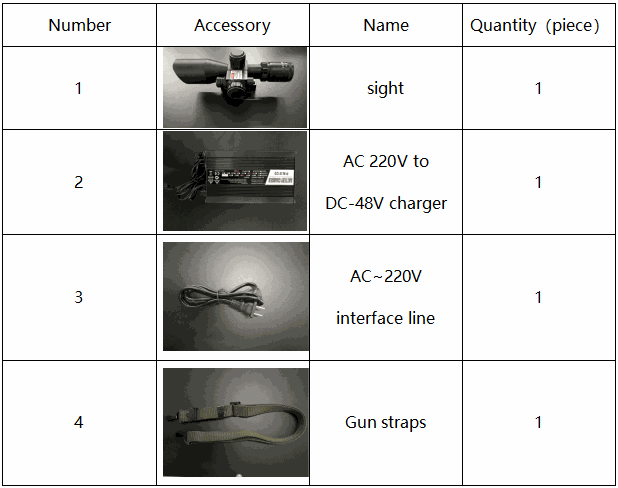
-----Accessory Description-----
Accessories Include Mainframe ,AC 220V To DC-48V Charger, Sight, Gun Straps And Instructions.
Diagram Of Whole
-----Technical Parameters-----
Channel | Frequency | Channel Power(±3dBm) |
CH1 | 300-400MHz | 40dBm |
CH2 | 400 - 500MHz | 40dBm |
CH3 | 840 - 850MHz | 40dBm |
CH4 | 900 - 930MHz | 40dBm |
CH5 | 1080 - 1300MHz | 40dBm |
CH6 | 1550 - 1620MHz | 40dBm |
CH7 | 2400 - 2500MHz | 40dBm |
CH8 | 5725 - 5850MHz | 40dBm |
Shielding Distance | 0 ~ 800m | |
Battery | DC48V/7A | |
Power Consumption | 168W | |
Weight | 7.2Kg | |
Size(Length × Width × Height) | 1010mm×320mm×50 Mm | |
Humidity | 5%-95% | |
Running Temperature | -20 To +50℃ | |